Hexo 整合 Travis-ci 自動建置與發佈
建立了新的部落格在 github.io 上面,想說順手把自動建置跟發佈一起做一做,但就遇到了一堆問題,原本以為 1~2 小時可以全部設定完,但整個週日就這樣不見了,主要還是沒用過 Travis-ci…
Github
Github Pages
我記得幾年前的 Github Pages 是在 repo 裡開一條 github-page branch ,然後在這條 branch 上的東西可以透過 github.io 讀到,但今天在建立時發現一定要發到 master branch 上,導致有許多網路上的教學一不敷使用。
Integrate with Travis-ci
這是整個 Travis-ci 與 blog 流程
安裝 TravisCI app 在 github repo 上
這部分沒有紀錄到,請自行參考網路上的方式。
install travis-ci app我們先將建立好的 Hexo repo 搬到新建立的 branch hexo 上,推上去後再回去把 master branch 清光光。
git checkout -b hexo
git add .
git commit -m "move to hexo"
git push
git checkout master
rm C:\Users\ghost\Projects\Github\blog\ -Recurse -Force
git add .
git commit -m "clean master"
git push
git checkout hexo- 在 repo 下建立一個
.travis.yml給 travis-ci 使用,請自行換掉設定
sudo: required
language: node_js
node_js: stable
cache: npm
branches:
  only:
  - hexo
before_install:
- npm install -g hexo-cli
install:
- npm install
script:
- hexo clean
- git config --global user.name "Ghost Yang"
- git config --global user.email "ghosttw88@hotmail.com"
- sed -i'' "s~git@github.com:GhostTW/ghosttw.github.io.git~https://${REPO_TOKEN}@github.com/GhostTW/ghosttw.github.io.git~" _config.yml
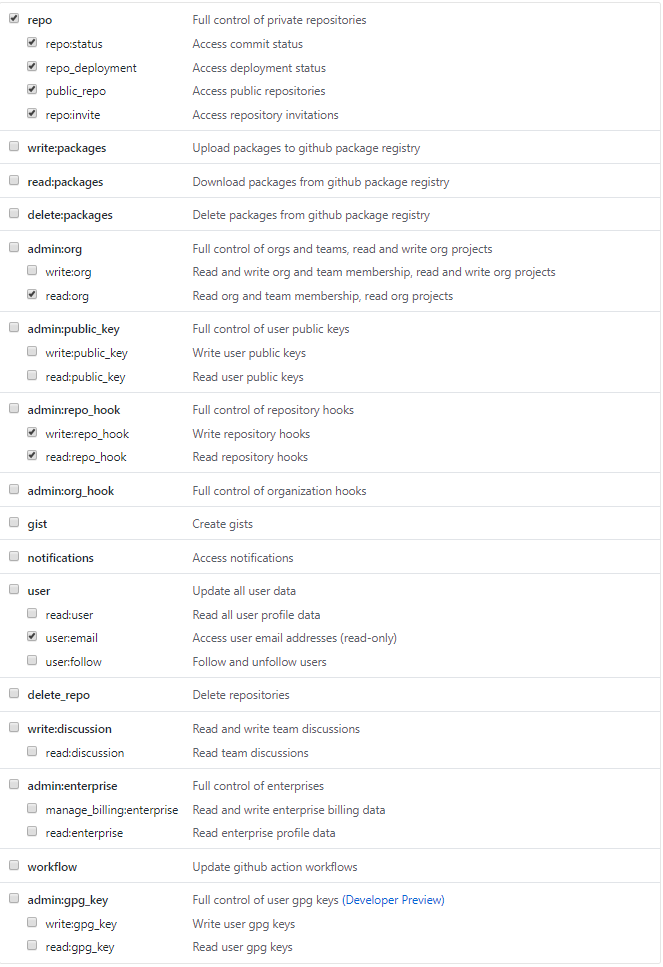
- hexo deploy- 在 github 取得 Personal Access token
GitHub > Settings > Developer settings > Personal access tokens > Generate new token

- 把這組 token 處理過後加入設定檔
- 確認有安裝過 ruby
- cmd 在 repo 下,執行以下指令,記得換掉 {personal_access_token}
gem isntall travis
travis login --pro --github-token {personal_access_token}
travis encrypt --com 'REPO_TOKEN={personal_access_token}' --add
它會自動在 .travis.yml 加入設定,讓 travis 在 build 時可以拿這個 token 換掉一開始在 .travis.yml 裡的 ${REPO_TOKEN} 字串
- _config.yml
最後一步在 _config.yml 設定 hexo deploy 方式
deploy:
  type: git
  repo: git@github.com:GhostTW/ghosttw.github.io.git
branch: master- Final
最後將你的 blog 推到 hexo 後就會自動建置嚕!